EasyPost ist nur in Nordamerika, Großbritannien und Australien verfügbar. Für weitere Informationen klicken Sie bitte hier.
EasyPost ist auf Versandlösungen spezialisiert und kann auf Tarife vieler Versanddienstleister zugreifen. Die Lightspeed eCom-Integration mit EasyPost unterstützt:
- USPS (USA)
- Canada Post
- UPS (Kanada/USA)
- FedEx (USA) / FedEx (Canada)
- DHL
- Purolator (Kanada)
- Australia Post
HINWEIS: Wenn Sie nicht beabsichtigen, einen Versanddienst zu nutzen, können Sie Ihre eigenen vordefinierten Versandtarife einrichten; weitere Informationen finden Sie unter Einrichten einer Versandart und Tarife.
Erste Schritte mit EasyPost
- Registrieren für EasyPost
- Konfigurieren Sie Ihre EasyPost-Versandoptionen im eCom-Backoffice.
- EasyPost-Speditionen konfigurieren.
Zum Registrieren bei EasyPost
Um den Versand per EasyPost anzubieten, melden Sie sich hier für EasyPost an.
So konfigurieren Sie EasyPost
- Gehen Sie im Hauptmenü Ihres Backoffice zu Einstellungen.
- Klicken Sie unter SHOP-EINSTELLUNGEN auf Versandarten.
- Klicken Sie auf EasyPost verbinden und konfigurieren Sie Ihre Optionen.
LOGIN-DATEN
- Diese Integration aktivieren - Aktivieren Sie den Umschalter, um EasyPost in Ihrem Online-Shop verfügbar zu machen.
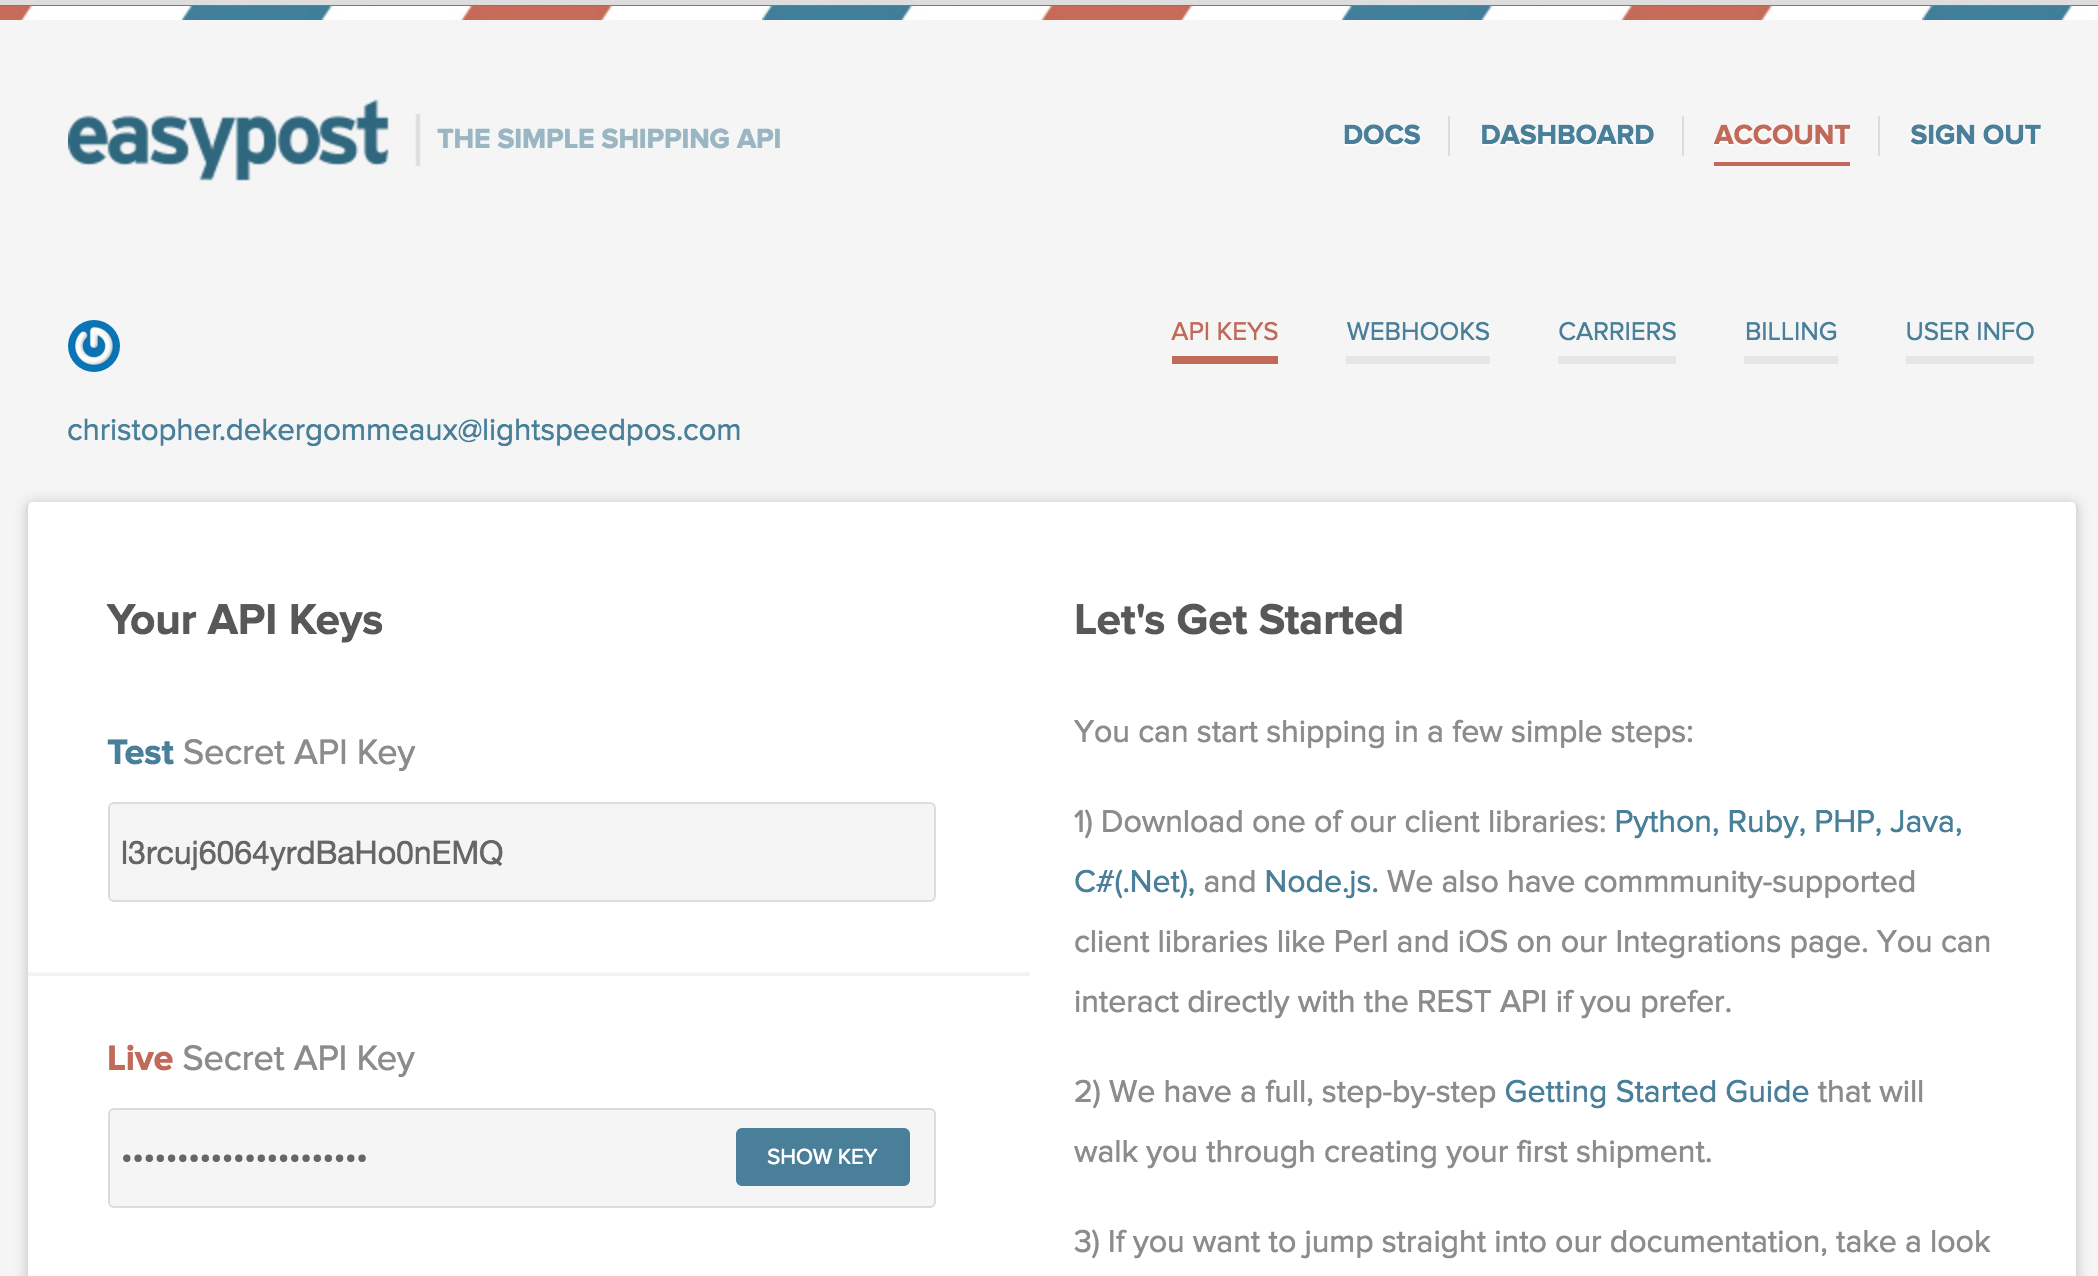
- API-Key - Geben Sie den API-Key für Ihr Konto ein. Er wird von EasyPost bereitgestellt und kann auch von Ihrem EasyPost-Konto abgerufen werden. Wichtig: EasyPost stellt Ihnen zwei API-Keys zur Verfügung: Testen und Live. Sie können den API-Testschlüssel während der Probezeit verwenden. Es werden Ihnen keine Kosten berechnet und keine der Anfragen erscheint in Ihrer Live-Berichterstattung. Sobald Sie mit dem Verkauf beginnen, müssen Sie den Live-API-Key eingeben.
- Anmelden bei Ihrem EasyPost-Konto.
- Gehen Sie zu EasyPost > Konto > API-Keys und zeichnen Sie Ihre API-Keys auf.
KONFIGURATION
- Steuersatz - Wählen Sie den Steuersatz für Ihren Standort. Verwenden Sie diese Option nicht, wenn Sie sich in den Vereinigten Staaten oder in Kanada befinden. Die Steuer wird automatisch abgewickelt, wenn Sie Ihre Steuern unter Einstellungen > ZAHLUNGSEINSTELLUNGEN > Steuern einrichten.
URSPRUNGSADRESSE
Geben Sie die Postanschrift Ihres Unternehmens ein, die auf den Rücksendeetiketten erscheinen soll.
SPEDITIONEN
Verwalten Sie die Spediteure und Service Levels, die Sie Ihren Kunden anbieten. Bitte beachten Sie unseren nächsten Abschnitt zur Konfiguration von EasyPost-Spediteuren für weitere Informationen.
EasyPost-Speditionen konfigurieren
Um Ihre EasyPost-Speditionen zu konfigurieren, müssen Sie diese zunächst in Ihrem EasyPost-Konto aktivieren. Erst danach können Sie Ihre EasyPost-Speditionen und Service Levels direkt aus Ihrem eCom-Backoffice heraus verwalten.
Aktivierung von Speditionen in Ihrem EasyPost-Konto
Standardmäßig hat EasyPost bereits USPS konfiguriert. Wenn Sie andere unterstützte EasyPost-Speditionen verwenden möchten, müssen Sie diese manuell über Ihr EasyPost-Konto aktivieren:
- Melden Sie sich bei Ihrem EasyPost-Konto an.
- Klicken Sie oben links auf Ihre E-Mail-Adresse und wählen Sie Speditionen aus.
- Wählen Sie die von Ihnen unterstützten Speditionen aus.
- Geben Sie die Kontoinformationen des Spediteurs ein, oder befolgen Sie die Anweisungen auf dem Bildschirm. Möglicherweise müssen Sie ein Konto bei der Spedition einrichten.
HINWEIS: USPS berechnet keine Versandkosten innerhalb Kanadas.
Verwaltung von Speditionen und Service Levels in Ihrem eCom Backoffice
Nachdem Sie Ihre Spediteure in Ihrem EasyPost-Konto aktiviert haben, erscheinen sie fast sofort in Ihrem eCom-Backoffice und Online-Shop. Standardmäßig sind alle Ihre Speditionen und Service Levels aktiviert.
Abhängig von Ihren Geschäftsanforderungen und der demographischen Kundenstruktur möchten Sie möglicherweise nur bestimmte Spediteure und Service Levels anbieten. Beobachten Sie beispielsweise einen Trend, dass die meisten Ihrer Kunden das günstigste Service Level nutzen, erhöht die Deaktivierung teurerer Service Levels möglicherweise die Kaufwahrscheinlichkeit.
Verwaltung Ihrer Speditionen und Service Levels:
- Gehen Sie im Hauptmenü Ihres Backoffice zu Einstellungen.
- Klicken Sie unter SHOP-EINSTELLUNGEN auf Versandarten.
- Klicken Sie auf EasyPost konfigurieren, und konfigurieren Sie Ihre Optionen.
- Im Abschnitt SPEDITIONEN können Sie Ihre Speditionen und Versandarten verwalten:
- indem Sie die Schalter Beim Bezahlvorgang anzeigen aktivieren/deaktivieren.
- indem Sie auf Bearbeiten klicken, um die ServiceLevel einer Spedition auszuwählen oder abzuwählen.
- Klicken Sie oben rechts auf unserer Seite auf Speichern.
Testen von Service-Stufen im Bezahlvorgang
Testen Sie Ihre Service-Stufen beim Bezahlvorgang, nachdem Sie diese bei EasyPost konfigurieren > Speditionen aktiviert haben. Wenn Sie erfahren möchten, wie Sie den Versand beim Bezahlvorgang testen können, klicken Sie hier.
Service-Stufen erscheinen nur dann beim Bezahlvorgang, wenn ihre Bedingungen erfüllt sind. Einige Bedingungen sind abhängig von:
- Der Versandadresse des Kunden
- Dem HS-Code eines Produkts bei internationalem Versand.
- Den Produktgewichten
- Den Produktabmessungen
Weitere Informationen zu den Bedingungen für die einzelnen Service-Stufen finden Sie in den Carrier Guides von EasyPost:
Einrichten des internationalen Versands mit EasyPost
Wenn alle Produkte im Warenkorb eines Käufers über zugehörige HS-Codes verfügen, hat er die Möglichkeit, an der Kasse mit EasyPost international zu versenden. For more information about setting up HS codes, click here.