Launching your eCom store is a huge accomplishment. This article explains the final steps to make your eCom store publically available on your domain. As domain providers are very different, the instructions are generalized.
Review these videos for help with setting up your domain inside a domain provider. Videos are currently only available in Dutch.
Prerequisites
- Own a domain name. For instructions on buying a new domain, click here.
- Added your domain to your eCom store. For instructions, click here.
- If you're replacing a publically available website with your new eCom store, read important instructions here.
- If you're keeping your eCom store and other website online on different subdomains, read important instructions here.
- Your eCom store is ready to be publically available on your domain. It is recommended you test your checkout to ensure you're ready. For instructions, click here.
Instructions
- Open your domain providers website and login to your account.
- Find the DNS settings. These may be referred to as managing your DNS or DNS zone files.
- Create a CNAME record. There may be 3 fields that require information:
- Host/alias: Type your subdomain. Ensure it matches the subdomain you entered in the eCom Back Office > Settings > Domains.
- Points to/destination: Copy and paste the Record 1 value from Settings > Website Settings > Domains > Connect your Domain. The period at the end of the value is usually not required by domain providers.
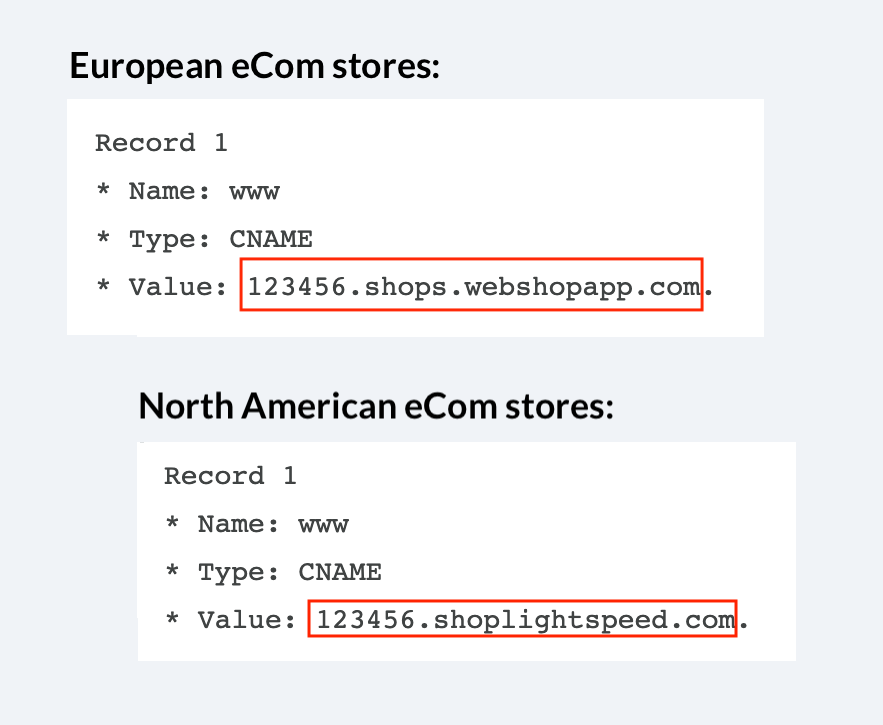
- Time to live (TTL): Time to live may be requested but it is not required to make changes to this field. Leave it as the default value or if no default is provided, select 1 hour or enter 3600 seconds.
- Save your changes. If you cannot save, click here for troubleshooting information.
- Host/alias: Type your subdomain. Ensure it matches the subdomain you entered in the eCom Back Office > Settings > Domains.
- Create two A records:
- Host/alias/name: Use the @ symbol.
- Points to/destination: enter the first IP address specified according to location, below.
- Save your changes. If you cannot save, click here for troubleshooting information.
- Repeat these steps using the second IP address.
Europe North America First IP address 104.16.8.49162.159.129.85Second IP address 104.17.156.30162.159.130.85
- Begin testing if your custom domain is live by opening a private browsing window. Depending on your web browser:
- File > New Private window (Firefox & Safari),
- File > New Incognito window (Chrome)
- File > New Inprivate window (Internet explorer & Microsoft Edge)
- Visit your website on your newly configured domain.
- If you see your Lightspeed eCom store load, your domain is connected. If not, try again in an hour. If after 2 hours you still can't see your site for troubleshooting details, click here .
- Once your domain is connected you can set your domain as the default one in your eCom Back Office. Do this only when your eCom store is live on your domain. Setting your domain as default could make you lose access to your Back Office.
- On the left menu of the Back Office, go to Settings > Website Settings > Domains.
- Click the Set as default button for the new domain you added.

Next steps
Now that your eCom store is live, it is recommended that you:
- Connect Google Analytics to track your traffic on your website. For instructions, click here.
- Update Google Search to start improving your search result ranking as fast as possible. For instructions, click here.
Replacing a publically available website with your new eCom store
You are planning on using Lightspeed eCom instead of your previous website. Before you follow the instructions in this article, read this section.
Preserving your search engine ranking
Your previous website is successful and you have a great search engine ranking.
- In this case, switching to Lightspeed eCom must be done with care. Adding redirects in Lightspeed eCom preserves your search engine ranking of your former website. For more information, click here.
Making the transition easy for your existing customers
You have a lot of traffic that go to your previous eCom store. When you launch your eCom store by following the instructions in this article, there could be some downtime for your customers.
- Depending on your business, advise your customers on your website that maintenance will occur. Provide a time when the maintenance will begin and end.
- Launch your eCom store during a period of low traffic.
Changing your domain name
If you have changed your domain name in any way, it is recommended you updating your traffic sources.
- For example, if you changed your web address name from https://www.lighspeedretail.com to https://www.lightspeedhq.com. Read more about it, here.
Keeping your eCom store and other website online on different subdomains
You are planning on keeping another website that will link users to your new eCom store. In order to do this, modify the instructions on this page by:
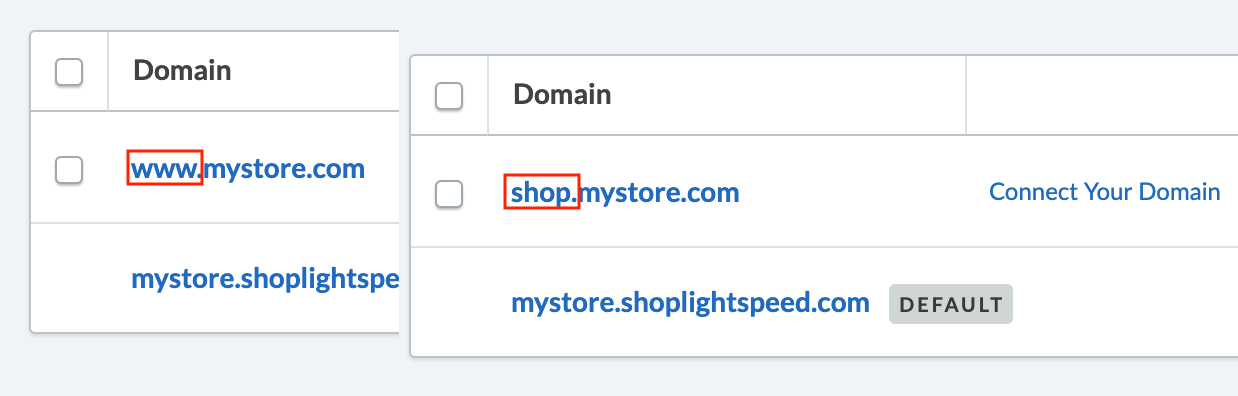
- When creating a CNAME record, choose a new subdomain that is not currently being used on your domain. For example, if your website is using www., then create a CNAME record as shop. Make sure it still matches what you enter in your eCom Back Office > Settings > Domain.
- Make sure you don't delete any records that exist in your domain provider. These are likely required for your other website.
- Create a custom link in your navigation on your eCom store's homepage to link your other website. This is useful for your customers to navigate between your two websites. For instructions, click here.